![](https://cdn.tutsplus.com/cg/uploads/legacy/446_Maya_Modeling_Shoes_PT1/Preview.jpg)
Hey guys, in this tutorial I am going to share with you the process of modeling a formal pair of leather shoes. We will first make a low poly model and then add details to that model. I will start with the sole of the shoe and then move further. I’m using a reference image of a shoe which will help me make the perfect shape, though I will follow my own designs.
Reference Image
![reference Image](https://cdn.tutsplus.com/cg/uploads/legacy/446_Maya_Modeling_Shoes_PT1/images/reference.jpg)
Step 1
Let’s start. Open Maya and set the project folder. In the side view, click on View>Image Plane>Import Image, then open the side view of the shoe. Similarly, open the back image of the shoe in the Front view.![Step 1 Image](https://cdn.tutsplus.com/cg/uploads/legacy/446_Maya_Modeling_Shoes_PT1/images/1.jpg)
![Step 1 Image](https://cdn.tutsplus.com/cg/uploads/legacy/446_Maya_Modeling_Shoes_PT1/images/1a.jpg)
Step 2
Open the Attribute Editor (press Ctrl + A), while selecting the image planes one by one in the Perspective view. Click on imageplane01, where the arrow is pointing.![Step 2 Image](https://cdn.tutsplus.com/cg/uploads/legacy/446_Maya_Modeling_Shoes_PT1/images/2.jpg)
![Step 2 Image](https://cdn.tutsplus.com/cg/uploads/legacy/446_Maya_Modeling_Shoes_PT1/images/2a.jpg)
Step 3
Now Create a Plane and increase its subdivision width and subdivision height as needed.![Step 3 Image](https://cdn.tutsplus.com/cg/uploads/legacy/446_Maya_Modeling_Shoes_PT1/images/3.jpg)
![Step 3 Image](https://cdn.tutsplus.com/cg/uploads/legacy/446_Maya_Modeling_Shoes_PT1/images/3a.jpg)
Step 4
Now jump into the Side view to adjust the shape of sole according to the side image.![Step 4 Image](https://cdn.tutsplus.com/cg/uploads/legacy/446_Maya_Modeling_Shoes_PT1/images/4.jpg)
Step 5
Now let’s extrude the sole. Jump into the Perspective view and press 5 to turn off X-ray mode. Select all the faces and Extrude them downward (Edit Mesh > Extrude.) This gives an overall thickness to the sole.![Step 5 Image](https://cdn.tutsplus.com/cg/uploads/legacy/446_Maya_Modeling_Shoes_PT1/images/5.jpg)
![Step 5 Image](https://cdn.tutsplus.com/cg/uploads/legacy/446_Maya_Modeling_Shoes_PT1/images/5a.jpg)
Step 6
Since we have made the sole, we don’t really need the bottom view now. We will use the Top view only. Therefore we will delete the bottom view image plane. Go to Window > Rendering Editor > Hypershade > Utilities. Then select the image plane and Delete it.![Step 6 Image](https://cdn.tutsplus.com/cg/uploads/legacy/446_Maya_Modeling_Shoes_PT1/images/6.jpg)
Step 7
Now Import the new image view and open the top view of the shoe. Now you know how to import an image plane. When you import the image, the image plane may seem quite large compared to the shoe's sole. In this situation you can adjust its size by increasing or decreasing the values of Width and Height.![Step 7 Image](https://cdn.tutsplus.com/cg/uploads/legacy/446_Maya_Modeling_Shoes_PT1/images/7.jpg)
![Step 7 Image](https://cdn.tutsplus.com/cg/uploads/legacy/446_Maya_Modeling_Shoes_PT1/images/7a.jpg)
Step 8
In the Perspective view select the top faces of the sole and Delete them.![Step 8 Image](https://cdn.tutsplus.com/cg/uploads/legacy/446_Maya_Modeling_Shoes_PT1/images/8.jpg)
![Step 8 Image](https://cdn.tutsplus.com/cg/uploads/legacy/446_Maya_Modeling_Shoes_PT1/images/8a.jpg)
Step 9
Go to the Side view, select the border edge and extrude it upwards.![Step 9 Image](https://cdn.tutsplus.com/cg/uploads/legacy/446_Maya_Modeling_Shoes_PT1/images/9.jpg)
![Step 9 Image](https://cdn.tutsplus.com/cg/uploads/legacy/446_Maya_Modeling_Shoes_PT1/images/9a.jpg)
Step 10
Now go to the Top view and adjust the mesh accordingly.![Step 10 Image](https://cdn.tutsplus.com/cg/uploads/legacy/446_Maya_Modeling_Shoes_PT1/images/10.jpg)
![Step 10 Image](https://cdn.tutsplus.com/cg/uploads/legacy/446_Maya_Modeling_Shoes_PT1/images/10a.jpg)
Step 11
Extrude the border edge one more time and also keep deforming the shape of the shoe accordingly.![Step 11 Image](https://cdn.tutsplus.com/cg/uploads/legacy/446_Maya_Modeling_Shoes_PT1/images/11.jpg)
![Step 11 Image](https://cdn.tutsplus.com/cg/uploads/legacy/446_Maya_Modeling_Shoes_PT1/images/11a.jpg)
Step 12
Now let’s cover the paw area of the shoe. Select both sides and then Bridge them as you can see in the figure below. To bridge the borders, go to Edit Mesh > Bridge.![Step 12 Image](https://cdn.tutsplus.com/cg/uploads/legacy/446_Maya_Modeling_Shoes_PT1/images/12.jpg)
Step 13
Now select the edges as shown the figure below.![Step 13 Image](https://cdn.tutsplus.com/cg/uploads/legacy/446_Maya_Modeling_Shoes_PT1/images/13.jpg)
![Step 13 Image](https://cdn.tutsplus.com/cg/uploads/legacy/446_Maya_Modeling_Shoes_PT1/images/13a.jpg)
Step 14
Now select the only the center edge and then Move it upward a bit to give it a rounded shape like a shoe.![Step 14 Image](https://cdn.tutsplus.com/cg/uploads/legacy/446_Maya_Modeling_Shoes_PT1/images/14.jpg)
![Step 14 Image](https://cdn.tutsplus.com/cg/uploads/legacy/446_Maya_Modeling_Shoes_PT1/images/14a.jpg)
Step 15
While still in the Side view, modify the mesh as you can see in the image below.![Step 15 Image](https://cdn.tutsplus.com/cg/uploads/legacy/446_Maya_Modeling_Shoes_PT1/images/15.jpg)
Step 16
In Perspective view, select some of the top edges on the shoe and Extrude them as shown.![Step 16 Image](https://cdn.tutsplus.com/cg/uploads/legacy/446_Maya_Modeling_Shoes_PT1/images/16.jpg)
Step 17
Now Select two vertices from the side view and move them down a bit.![Step 17 Image](https://cdn.tutsplus.com/cg/uploads/legacy/446_Maya_Modeling_Shoes_PT1/images/17.jpg)
![Step 17 Image](https://cdn.tutsplus.com/cg/uploads/legacy/446_Maya_Modeling_Shoes_PT1/images/17a.jpg)
Step 18
Create some distance between these three selected edge loops because we don’t want any dents on the shoe surface. Therefore it is very important to create a gap between them.![Step 18 Image](https://cdn.tutsplus.com/cg/uploads/legacy/446_Maya_Modeling_Shoes_PT1/images/18.jpg)
Step 19
Go to Edit Mesh > Insert An Edge Tool, and insert an edge as shown in the image below.![Step 19 Image](https://cdn.tutsplus.com/cg/uploads/legacy/446_Maya_Modeling_Shoes_PT1/images/19.jpg)
Step 20
Now we have to fill the hole. Select the edge loop shown below by double clicking on the edge and the go to Mesh > Fill Hole, to fill the hole.![Step 20 Image](https://cdn.tutsplus.com/cg/uploads/legacy/446_Maya_Modeling_Shoes_PT1/images/20.jpg)
![Step 20 Image](https://cdn.tutsplus.com/cg/uploads/legacy/446_Maya_Modeling_Shoes_PT1/images/20a.jpg)
Step 21
Now we have to adjust the mesh flow so that there won't be any dents in the mesh.![Step 21 Image](https://cdn.tutsplus.com/cg/uploads/legacy/446_Maya_Modeling_Shoes_PT1/images/21.jpg)
![Step 21 Image](https://cdn.tutsplus.com/cg/uploads/legacy/446_Maya_Modeling_Shoes_PT1/images/21a.jpg)
![Step 21 Image](https://cdn.tutsplus.com/cg/uploads/legacy/446_Maya_Modeling_Shoes_PT1/images/21b.jpg)
![Step 21 Image](https://cdn.tutsplus.com/cg/uploads/legacy/446_Maya_Modeling_Shoes_PT1/images/21c.jpg)
Step 22
Now Select some edges on tip of the shoe and slide them backward with the help of the Slide Edge Tool.![Step 22 Image](https://cdn.tutsplus.com/cg/uploads/legacy/446_Maya_Modeling_Shoes_PT1/images/22.jpg)
![Step 22 Image](https://cdn.tutsplus.com/cg/uploads/legacy/446_Maya_Modeling_Shoes_PT1/images/22a.jpg)
Step 23
Now select the shoe and press ‘3’ to check the smoothness of the shoe. Press ‘1’ to unsmooth the shoe again.![Step 23 Image](https://cdn.tutsplus.com/cg/uploads/legacy/446_Maya_Modeling_Shoes_PT1/images/23.jpg)
Step 24
Now Select the edge loop highlighted below, but deselect the shoe’s toe edges.![Step 24 Image](https://cdn.tutsplus.com/cg/uploads/legacy/446_Maya_Modeling_Shoes_PT1/images/24.jpg)
![Step 24 Image](https://cdn.tutsplus.com/cg/uploads/legacy/446_Maya_Modeling_Shoes_PT1/images/24a.jpg)
Step 25
Now go to Edit Mesh>Split Polygon Tool and create an edge on the shoe as shown in the following image.![Step 25 Image](https://cdn.tutsplus.com/cg/uploads/legacy/446_Maya_Modeling_Shoes_PT1/images/25.jpg)
![Step 25 Image](https://cdn.tutsplus.com/cg/uploads/legacy/446_Maya_Modeling_Shoes_PT1/images/25a.jpg)
Step 26
Now select the faces I have shown in the image below.![Step 26 Image](https://cdn.tutsplus.com/cg/uploads/legacy/446_Maya_Modeling_Shoes_PT1/images/26.jpg)
Step 27
Go to Edit Mesh > Duplicate Faces and click on the option box.![Step 27 Image](https://cdn.tutsplus.com/cg/uploads/legacy/446_Maya_Modeling_Shoes_PT1/images/27.jpg)
![Step 27 Image](https://cdn.tutsplus.com/cg/uploads/legacy/446_Maya_Modeling_Shoes_PT1/images/27a.jpg)
![Step 27 Image](https://cdn.tutsplus.com/cg/uploads/legacy/446_Maya_Modeling_Shoes_PT1/images/27b.jpg)
Step 28
Once again select the faces as I have selected them in the image below and Delete them.![Step 28 Image](https://cdn.tutsplus.com/cg/uploads/legacy/446_Maya_Modeling_Shoes_PT1/images/28.jpg)
![Step 28 Image](https://cdn.tutsplus.com/cg/uploads/legacy/446_Maya_Modeling_Shoes_PT1/images/28a.jpg)
![Step 28 Image](https://cdn.tutsplus.com/cg/uploads/legacy/446_Maya_Modeling_Shoes_PT1/images/28b.jpg)
Step 29
Now go to the Side view, and insert an edge loop to modify the separated geometry.![Step 29 Image](https://cdn.tutsplus.com/cg/uploads/legacy/446_Maya_Modeling_Shoes_PT1/images/29.jpg)
![Step 29 Image](https://cdn.tutsplus.com/cg/uploads/legacy/446_Maya_Modeling_Shoes_PT1/images/29b.jpg)
Step 30
Now the basic model of the shoe is almost done.![Step 30 Image](https://cdn.tutsplus.com/cg/uploads/legacy/446_Maya_Modeling_Shoes_PT1/images/30.jpg)
![Step 30 Image](https://cdn.tutsplus.com/cg/uploads/legacy/446_Maya_Modeling_Shoes_PT1/images/30a.jpg)
![Step 30 Image](https://cdn.tutsplus.com/cg/uploads/legacy/446_Maya_Modeling_Shoes_PT1/images/30b.jpg)
Step 31
Now the main and basic part of the shoe model is ready. You can make all the further improvements in the design of the shoe as per your requirement.
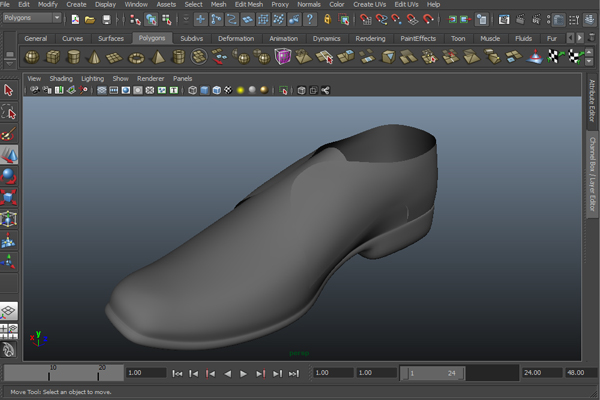
![Step 31 Image](https://cdn.tutsplus.com/cg/uploads/legacy/446_Maya_Modeling_Shoes_PT1/images/31.jpg)
Step 32
Now we will create holes for the shoe laces. Pick the Split Polygon Tool (Edit Mesh > Split Polygon Tool) and make 3 square shapes on both sides.![Step 32 Image](https://cdn.tutsplus.com/cg/uploads/legacy/446_Maya_Modeling_Shoes_PT1/images/32.jpg)
![Step 32 Image](https://cdn.tutsplus.com/cg/uploads/legacy/446_Maya_Modeling_Shoes_PT1/images/32a.jpg)
Step 33
Let’s create the shoelaces. Create a Cylinder, set the Subdivision Axis to 8 and the Subdivision Caps to 2.![Step 33 Image](https://cdn.tutsplus.com/cg/uploads/legacy/446_Maya_Modeling_Shoes_PT1/images/33.jpg)
![Step 33 Image](https://cdn.tutsplus.com/cg/uploads/legacy/446_Maya_Modeling_Shoes_PT1/images/33a.jpg)
![Step 33 Image](https://cdn.tutsplus.com/cg/uploads/legacy/446_Maya_Modeling_Shoes_PT1/images/33b.jpg)
![Step 33 Image](https://cdn.tutsplus.com/cg/uploads/legacy/446_Maya_Modeling_Shoes_PT1/images/33c.jpg)
![Step 33 Image](https://cdn.tutsplus.com/cg/uploads/legacy/446_Maya_Modeling_Shoes_PT1/images/33d.jpg)
![Step 33 Image](https://cdn.tutsplus.com/cg/uploads/legacy/446_Maya_Modeling_Shoes_PT1/images/33e.jpg)
![Step 33 Image](https://cdn.tutsplus.com/cg/uploads/legacy/446_Maya_Modeling_Shoes_PT1/images/33f.jpg)
![Step 33 Image](https://cdn.tutsplus.com/cg/uploads/legacy/446_Maya_Modeling_Shoes_PT1/images/33g.jpg)
Step 34
Hide the back part of the shoe. Select the front part of the shoe and select all the faces except the sole, and then go to Mesh > Extract. This splits the sole apart from rest of the mesh.![Step 34 Image](https://cdn.tutsplus.com/cg/uploads/legacy/446_Maya_Modeling_Shoes_PT1/images/34.jpg)
Step 35
Now isolate the sole. Select and cover its top surface which was deleted, by using Bridge (Edit Mesh > Bridge.)![Step 35 Image](https://cdn.tutsplus.com/cg/uploads/legacy/446_Maya_Modeling_Shoes_PT1/images/35.jpg)
Step 36
Bring the back portion of the shoe back. Now we have to improve the shape of the shoe’s back part.![Step 36 Image](https://cdn.tutsplus.com/cg/uploads/legacy/446_Maya_Modeling_Shoes_PT1/images/36.jpg)
Step 37
So this time isolate the back part and Select all the faces.![Step 37 Image](https://cdn.tutsplus.com/cg/uploads/legacy/446_Maya_Modeling_Shoes_PT1/images/37.jpg)
![Step 37 Image](https://cdn.tutsplus.com/cg/uploads/legacy/446_Maya_Modeling_Shoes_PT1/images/37a.jpg)
Step 38
Similarly select the front part of the shoe and make it an isolated selection. Then select all the faces and extrude them inside too.![Step 38 Image](https://cdn.tutsplus.com/cg/uploads/legacy/446_Maya_Modeling_Shoes_PT1/images/38.jpg)
Step 39
Congrats! Our low poly shoe is now ready.![Step 39 Image](https://cdn.tutsplus.com/cg/uploads/legacy/446_Maya_Modeling_Shoes_PT1/images/39.jpg)
Step 40
Now all we have to do is add some detailing to the shoe. We will start with the sole, so Insert 4 edge loops in the sole as shown.![Step 40 Image](https://cdn.tutsplus.com/cg/uploads/legacy/446_Maya_Modeling_Shoes_PT1/images/40.jpg)
![Step 40 Image](https://cdn.tutsplus.com/cg/uploads/legacy/446_Maya_Modeling_Shoes_PT1/images/40a.jpg)
Step 41
Add supporting edges where you want hard corners.![Step 41 Image](https://cdn.tutsplus.com/cg/uploads/legacy/446_Maya_Modeling_Shoes_PT1/images/41.jpg)
![Step 41 Image](https://cdn.tutsplus.com/cg/uploads/legacy/446_Maya_Modeling_Shoes_PT1/images/41a.jpg)
Step 42
Now we have to add the detailing to the back part of the shoe. Similarly add supporting edges to harden the corners.![Step 42 Image](https://cdn.tutsplus.com/cg/uploads/legacy/446_Maya_Modeling_Shoes_PT1/images/42.jpg)
Step 43
Now add supporting edges to the front part of the shoe to make hard corners where ever you want.![Step 43 Image](https://cdn.tutsplus.com/cg/uploads/legacy/446_Maya_Modeling_Shoes_PT1/images/43.jpg)
Step 44
Additionally I have made a simple logo to cling onto the shoe. To make the logo Create a Box with two horizontal and one vertical edge.![Step 44 Image](https://cdn.tutsplus.com/cg/uploads/legacy/446_Maya_Modeling_Shoes_PT1/images/44.jpg)
Step 45
First of all press Shift + Alt + D, to Delete all the history; it will help to reduce the file size. Select the whole shoe and press Ctrl + G to make a group of all the parts together. Now with the shoe selected, go to Edit > Duplicate Special, and make a duplicate on the opposite side. Finally our pair of shoes is ready. Now in the next part of the tutorial, we will do Unwrapping, Texturing and Lighting of the shoes.![Step 45 Image](https://cdn.tutsplus.com/cg/uploads/legacy/446_Maya_Modeling_Shoes_PT1/images/45.jpg)