Excel
Animated Spreadsheets: How to Make Pixel Animation in Excel
Animated Spreadsheets: How to Make Pixel Animation in Excel
Unknown
Unknown
When you think of Excel, you inevitably think of numbers, calculations or finances. It’s very unlikely that you’ll ever think of fun, creativity or animation with spreadsheets, but maybe we can do something about that!
As a child, you may have turned a school textbook into a flipbook animation. The original "motion picture," flipbooks give the illusion of animation by quickly flipping through the pages, where each page holds the same character in a progressively different position. It just so happens that Excel is pretty great at getting the same treatment.
We’re going to be making what I like to call “scrollbooks.” They’re the digital version of the good old fashioned flipbooks, with scrolling replacing the flipping of the pages. Excel pages will be our animation frames, and cells will be our pixels. This tutorial will show you everything you need to make eye-catching pixel art animations using just a trusty spreadsheet.
A Spreadsheet Canvas
So first, let’s setup our Excel file. Start a new document and select Page Layout either in the Layout tab or with the bottom left buttons:
In the zoom level dropdown menu select One Page:
Now the pages always stay in the same position whenever you scroll. Pages are now frames for our animation.
To make the cells into square pixels first select all (Command-A) then go to the Cells > Format menu, in the Home tab. There, change the Row Height to 0.55cm and the column width to 0.55cm.
You can use smaller or larger pixels, but this pixel size on US Letter-sized pages gives us a resolution of 31x40 px which is great for the simple animations we’ll be creating. “31x40” is mildly infuriating and our character will be more centered if the number of horizontal pixels is even, but trying to change all column widths equally only results in odd numbers for some reason, so to get the resolution down to 30x40 I had to change the widths of columns A, B and AC, AD to 0.65cm.
All Cells, no Numbers
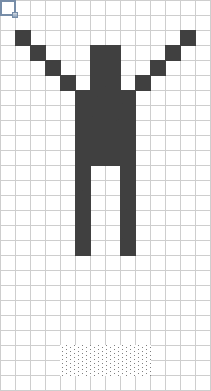
The canvas is ready. We’ll be making a jumping man animation, and it will be “loopable” so that we can easily extend the duration of the animation.
Our very simple character will have a 2x3 px head. You can change your character’s design but you might want to go to a drawing application like Photoshop for that, so you can more freely try alternatives before taking the time to recreate the design in spreadsheet cells.
I suggest you locate the head on columns O and P and rows 21-23. Select those cells:
Select the cells for the first part of the guy: his head.
Right-click on the selected cells and go to Format Cells… (or press Command-1) then go to the Fill tab and select a dark color, You can use a custom color but since you’ll be doing this many times it might be preferable to stick to the theme colors.
The character’s torso will be 4x6 px, his legs 6 px vertically and his arms 4px across.
You can increase selected cells and blocks of cells by holding down the Command key.
We’ll add a shadow using the pattern option. You could also use a light grey for the shadow but I like the retro feel the pattern gives. Patterns are in the same Format Cells > Fill tab but they’re in the Foreground options.
Now frame 1 (out of 11) is complete. Select all the cells from that page and copy them, then scroll down to the second page, select cell A1 and paste.
The changes for frame 2 would be the man flexing his legs for the jump just by shortening them by 1px, and also bringing his arms down 1 px at the shoulders and another 1 px at the middle, like this:
In frame 3 we’ll have the man flexing his legs a little bit more, so we cut the legs short by another pixel. And we’ll lower the arms a little bit more, so that they are diagonal:
You can move large portions of the graphic by copying and pasting blocks of cells rather than editing all the cells manually.
In frame 4 his arms will remain the same but he’ll be already in the air, legs fully extended to 6 px tall and the whole body 1 px above his shadow, which stays in the same place throughout the animation.
For frame 5 we’ll extend his arms horizontally again. You can paste frame 1 here, only he should be higher in the air, 2 px over last frame—which means 3 px above his shadow. As a fun little detail I’m making the shadow softer as he goes farther off the ground without changing the color but by changing the pattern to a slightly lighter one.
In frame 6 he is another 2 px higher than in frame 5 and his arms are going slightly higher:
In frame 7 he only rises 1 more pixel but his arms rise a little bit more and I made his shadow a slightly lighter pattern again:
In frame 8 he doesn’t rise anymore, he remains in the same position as he’s at the peak of the jump, only his arms go one pixel higher to form diagonals:
In frame 9 he begins to go back down, just by 1 px. His shadow is a bit darker. You could copy and paste frame 6, the only difference is that we’ll delay the arms’ motion by a couple of frames, so his arms will still be diagonals as in frame 8:
Frame 10 should be like frame 5 but with the arms in the position of frame 7:
Frame 11 closes the loop, he’s still in the air but the next frame would be the first we made. The shadow returns to the original pattern. It’s like frame 4 but the arms are as they were in frame 6:
Turn Excel Into an Animation Viewer
Now that the animation is complete you’ll want to select the bottom right cell from page 11 and scroll up to page 1, and holding down shift select the top left cell from that page to copy the whole animation. You’ll go to page 12 and select the top left cell (A1) and paste. Paste again down at page 23 and repeat as many times as you want. I think looping it 4 times does the trick.
To wrap up the file you’ll want to go to Layout > View, and uncheck Headings, to avoid the cell numbers moving the page slightly when they go into four digits. You can also uncheck Gridlines to not see the cell borders, it’s cleaner but it looks less like a spreadsheet, so it’s up to you if you’ll leave that on or off:
Then resize the window to match the page proportions and give the spreadsheet a clever name:
So clever.
You could also add some instructions or title to the first page:
Use your imagination here: this page is the first thing anyone will see when they look at your animation.
And it’s done! Just scroll from the beginning of your spreadsheet to the end to see the animation, or check out the video below to see it in action:
There's so Much More You Could do
If you finished the jumping man and still want to do another scroll book, you could give the “jumping poodle” a try:
Blue crosshairs added just as guidelines.
Or create any animation you'd like, using these techniques. And share it—after all, it's not often you can send an Excel file just for fun. We'd love to see any animations you make in the comments below! Or, if you have any trouble animating your spreadsheet, leave a comment and we'll be sure to help you out.